Quick Answer: Giving insulin injections to your child with Type 1 Diabetes can feel scary at first, but it becomes routine with practice. The key steps: choose the right site (tummy, thigh, or upper arm), pinch the skin, insert the needle at 90°, inject slowly, and hold for 10 seconds before removing. Rotate injection sites to prevent lumps. With proper technique and your pediatrician’s guidance, you’ll both become comfortable with this life-saving routine.
Understanding Type 1 Diabetes and Insulin
In Type 1 Diabetes (T1D), the body’s immune system destroys the insulin-producing cells in the pancreas. Without insulin, the body cannot use glucose for energy, causing blood sugar to rise to dangerous levels.
Why Insulin Injections Are Necessary
| Without Insulin | With Insulin |
|---|---|
| Blood sugar rises dangerously | Blood sugar stays controlled |
| Body cannot use food for energy | Body functions normally |
| Can lead to diabetic ketoacidosis | Prevents complications |
| Long-term organ damage | Healthy growth and development |
Reassurance: While managing T1D requires daily effort, children with diabetes can live full, active, healthy lives with proper insulin management.
What You’ll Need
Essential Supplies
| Item | Purpose |
|---|---|
| Insulin (as prescribed) | The medication |
| Insulin syringes or pen | Delivery device |
| Alcohol swabs | To clean injection site |
| Sharps container | Safe needle disposal |
| Blood glucose meter | Monitor sugar levels |
| Logbook or app | Track doses and readings |
| Emergency glucagon kit (if prescribed) | Treats severe low blood sugar when the child can’t swallow |
Storage Tips
- Store unopened insulin in refrigerator (2-8°C)
- In-use insulin can be at room temperature (up to 28 days)
- Never freeze insulin
- Check expiry dates regularly
- Discard if insulin looks cloudy (unless it’s supposed to be)
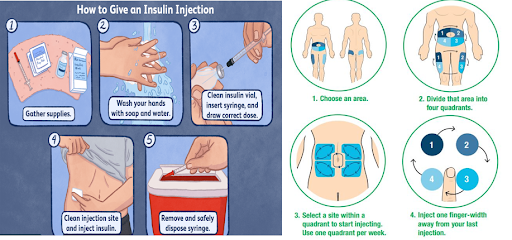
Step-by-Step Injection Guide
1. Preparation
- Wash hands thoroughly with soap and water
- Check insulin - correct type, not expired, looks normal
- If using cloudy insulin - gently roll between palms (don’t shake)
- Gather supplies - syringe/pen, alcohol swab, sharps container
2. Drawing Up Insulin (For Syringes)
- Clean the insulin vial top with alcohol swab
- Pull back plunger to draw air equal to dose needed
- Insert needle into vial, inject air
- Turn vial upside down
- Pull back plunger to draw correct dose
- Check for air bubbles - tap to remove, push out excess
3. Choosing Injection Site
Best Sites for Children:
| Site | Best For | Notes |
|---|---|---|
| Abdomen | Fastest absorption | Avoid 2 inches around belly button |
| Thighs | Easy for self-injection | Outer, front area |
| Upper arms | Good for thin children | Back of upper arm |
| Buttocks | Slowest absorption | Upper outer area |
4. Giving the Injection
- Clean the site with alcohol swab, let dry
- Pinch the skin gently to create a fold
- Insert needle at 90° angle (or 45° for thin children)
- Push plunger slowly and steadily
- Count to 10 before removing needle
- Release skin and remove needle straight out
- Apply gentle pressure - don’t rub
Site Rotation: Why It Matters
The Importance of Rotation
Injecting in the same spot repeatedly can cause:
- Lipohypertrophy - Hard lumps under skin
- Poor insulin absorption - Unpredictable blood sugar
- Skin damage - Scarring and discoloration
Rotation Pattern
Create a mental grid pattern:
- Divide each area into sections
- Move to new section each injection
- Don’t return to same spot for 1-2 weeks
- Keep a rotation log if helpful
Making Injections Easier for Children
For Younger Children
| Strategy | How It Helps |
|---|---|
| Let them choose the site | Gives sense of control |
| Use distraction | Videos, songs, counting |
| Praise and rewards | Positive reinforcement |
| Stay calm | Children sense your anxiety |
| Use numbing cream | EMLA cream 30 min before |
| Quick and confident | Don’t hesitate |
For Older Children
- Gradually teach self-injection
- Start with pushing the plunger while you hold
- Progress to choosing site and preparing
- Eventually, full independence with supervision
Goal: Most children can self-inject by age 8-10 with proper training and support.
Common Problems and Solutions
| Problem | Solution |
|---|---|
| Injection hurts | Use new needle each time, inject at room temperature |
| Bruising at site | Don’t inject into veins, apply pressure after |
| Lumps forming | Improve rotation, don’t use lumpy areas |
| Insulin leaking out | Count to 10 before removing needle |
| Child refuses | Take a break, offer choices, seek counseling if persistent |
When to Seek Help
Call Your Diabetes Team If:
- Blood sugar consistently too high or low
- Signs of infection at injection site
- Persistent lumps that don’t improve
- Child develops fear that interferes with treatment
- Any questions about dose or technique
Emergency Signs:
- Blood sugar very high (>300 mg/dL) with ketones
- Blood sugar very low (<70 mg/dL) and child can’t eat or drink
- Confusion, extreme fatigue, vomiting
- Difficulty breathing
🚨 If your child is unconscious, having a seizure, or cannot safely swallow (severe low blood sugar): do NOT force food or fluids into the mouth. If you have an emergency glucagon kit prescribed by your diabetes team, give it now as instructed. Then call 112 (national emergency) or 108 (ambulance) or take your child to the nearest hospital immediately. The same applies if you suspect diabetic ketoacidosis (high sugar with ketones, deep rapid breathing, vomiting, drowsiness).
Frequently Asked Questions
Q: Can I use the same needle more than once?
A: It’s not recommended. Needles become dull after one use, making injections more painful and increasing infection risk. Always use a new needle.
Q: What if my child cries every time?
A: This is common initially. Stay calm, be quick and confident, offer comfort afterward. If it persists, ask your diabetes team about strategies or numbing cream.
Q: Can insulin be given through clothing?
A: It’s not recommended. While some do it in emergencies, it increases infection risk and makes site rotation harder to track.
Q: How do I handle injections at school?
A: Work with the school to create a diabetes management plan. A school nurse or trained staff can help, or older children can self-inject with supervision.
Q: What if I accidentally give too much insulin?
A: If your child is awake and able to swallow, give fast-acting sugar (fruit juice, glucose tablets, or sugar dissolved in water) and re-check blood sugar after 15 minutes. Monitor closely and call your diabetes team for guidance. If your child becomes drowsy, confused, unconscious, or unable to swallow, do NOT put anything in the mouth — give an emergency glucagon kit if you have one prescribed, then 🚨 call 112 (national emergency) or 108 (ambulance) or rush to the nearest hospital.
Key Takeaways
- Proper technique - Pinch skin, inject at correct angle, count to 10
- Rotate sites - Prevents lumps and ensures proper absorption
- Stay organized - Keep supplies ready and track doses
- Make it routine - Same time each day helps both of you
- Empower your child - Gradual independence builds confidence
- Seek support - Your diabetes team is there to help
This article was reviewed by pediatricians at Babynama. Last updated: January 2026
Need personalized guidance? Book a consultation with our pediatricians or explore our Care Plans for 24/7 expert support!
Related Tools
General information for Indian parents, not a substitute for your pediatrician or diabetes team. Insulin doses and adjustments must always be individualised by your child’s doctor. In an emergency, call 112 or 108.